Category: 3d
Categories
Molehill Convolution
Updated: 17/11/2011
First up here is the demo:
click here
Controls:
Mouse to move camera
Mouse wheel to zoom
Space bar to toggle mouse movement
check box to turn the post processing on or off
number 0-9 on keyboard to try some preloaded filters (emboss, blur, edge detection etc…)
slider to control the sample offset
you can enter your own values into the matrix if you like, but be nice as there isn’t any error checking
let me know if it works for you!
will need flash player 11 to view
get flash player
video of it running if the demo fails:
So what is a convolution filter and how does it work?
Basically a convolution filter (with regards to images) is where for each pixel to be sampled, a set of surrounding pixels is also sampled. The influence of the surrounding pixels is controlled by a matrix.
i.e.
[0,0,0,
0,1,0,
0,0,0]
The current pixel is represented by the middle value.
The 1st value in the matrix is a sample taken from the pixel North-West of the current pixel
2nd is North
3rd is North-East
4th is East
…
i.e.
[NW, N, NE,
W , x, E
SW , S, SE]
x = the current pixel
so the positions in the matrix determine where the samples come from and the values in the matrix determine their influence.
in the matrix
[0,0,0,
0,1,0,
0,0,0]
all the surrounding pixels will have no (0) influence on the output
with the following matrix
[1,1,1,
1,1,1,
1,1,1]
they all have equal weighting effectively blurring the image
various effects can be achieved by using difference weight combinations such as edge detection and sharpening.
How to do it with the AGAL helper:
simply call:
AGAL.convolve(output, sample, texture, uv, offset, matrix)+
where output is the destination register
where sample is a temporary register for storing the modified uvs
where texture is the texture to sample from
where uv is the current uv coord of the sample (usually passed from the vertex shader)
where offset* is the value to offset the samples by (you will need to calculate this with something like 1/viewportWidth)
where matrix** is the convolution matrix
*at the moment the same offset is used for x and y when in reality there should be two (one for each axis) will add this in at a later date as it hasn’t caused an issue so far.
**
sample code to upload a matrix of 9 values from a vector of numbers called “_filter” into fragment constant 0 – 2:
context3D.setProgramConstantsFromVector(Context3DProgramType.FRAGMENT, 0, Vector.<Number>([_filter[0],_filter[1],_filter[2], 1])); context3D.setProgramConstantsFromVector(Context3DProgramType.FRAGMENT, 1, Vector.<Number>([_filter[3],_filter[4],_filter[5], 1])); context3D.setProgramConstantsFromVector(Context3DProgramType.FRAGMENT, 2, Vector.<Number>([_filter[6],_filter[7],_filter[8], 1])); |
for this to work properly you should normalise you matrix so that the sum of the values in your matrix == 1.
here is some code to do that:
var sum:Number = 0; for(var i:int = 0 ; i < _filter.length; i++) { sum += _filter[i]; } for(i = 0 ; i < _filter.length; i++) { if(_filter[i] != 0 && sum != 0)_filter[i] /= sum; } |
this would turn the matrix
[1,1,1,
1,1,1,
1,1,1]
into
[1/9,1/9,1/9,
1/9,1/9,1/9,
1/9,1/9,1/9]
good luck 🙂
Categories
Next Post?
Super busy at the moment but would like to smash out a new post.
Will be one of the following:
1. Rendering a Depth Texture with molehill
2. Applying Convolution filters with molehill (blur, edge detection, sharpening)
3. Will update the AGAL helper with some examples (diffuse shading, specular shading, rim shading, etc..)
Any preferences? If not ill just do whichever one I have time to do.
Categories
Depth of Field – molehill styleee
Depth of Field (dof) for adobe molehill.
Right I have tried a few ways to do this each with its advantaged and disadvantages, so what I will do is run you through how I approached this and how to implement it (leaving some bits down to you).
So what is depth of field?
Depth of field is an effect whereby object viewed at a particular focal distance (distance from camera) are sharper and those that are further from this point look blurrier.

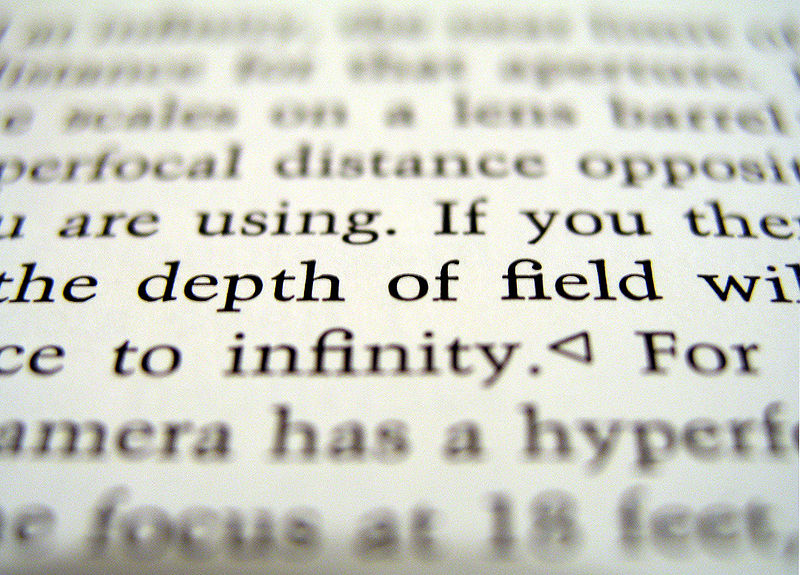
(images from wikipedia)
What we want to do is emulate this effect in our 3d environment (molehill woo)!
To do this we need to consider a couple of things, the effect will be applied as a post process which requires additional depth information and a way to blur stuff.
Post processing:
These are effects applied to a scene AFTER it has already been rendered, and is achieved by doing the following.
Rendering to a texture instead of the backbuffer.
Performing some kind of effect (the post process) using the scene texture as an input and then outputting the result.
This resultant texture is then used to colour a screen aligned quad (pretty easy to set up) and then this is rendered to the back buffer.
Depth information:
This is information that describes the depth of each pixel relative to the camera from 0-1 (black to white) based on the near and far planes.
Normally one has access to the depth buffer, sadly we do not, happily we can make one 🙂
All you got to do is render you whole scene again to a new texture with one depth material for every object. (this is a pretty fast process as the depth material has a pretty simple shaders and there is no program swapping between models as they all share)
I will probably not describe how to produce one of these in this article.
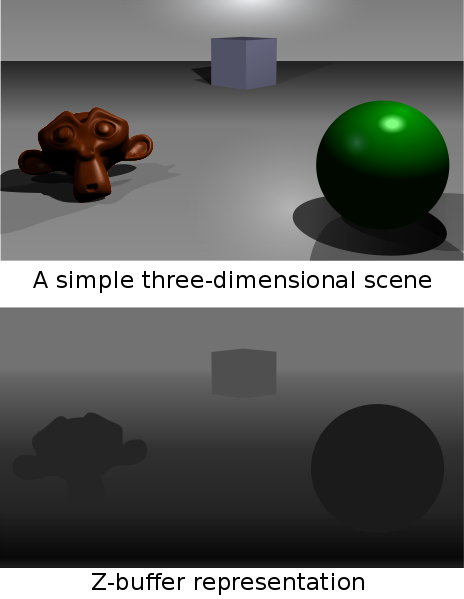
(thanks again wikipedia)
Blur:
To simulate being out of focus we can use a blur, this is a large area in graphics and there are at least 6 zillion ways to do it. I will share a couple and you can decide what you want to use.
1. render the texture again to another target but this time use a smaller one (maybe 1/16th the size) then when this is stretched back up it will be blurred.
2. some kind of of simple fast blur in the pixel shader (i.e. for each pixel sample 8 pixels around it and take an average)
3. gaussian blur, more complex and slower but produces nice results, must be rendered a few times (x, then y and maybe repeat)
Now we should have ourselves 2 or 3 textures, one scene render, one depth render and maybe a blur texture… now what?
Here is the fun part
we take our textures in as parameters to our DOF post process then use a sprinkling of magic to get the result we want.
the magic:
use the depth information compared against the focal point to determine a blur factor.
this factor can be used in two ways depending on your approach.
a. use the factor as an interpolation ratio to lerp (interpolate) between the original and the blurred texture
b. use the factor to determine the blur amount in your blur pass.
its that simple 🙂
(the tough bit is setting up the textures correctly and the blur shaders can get complex)
so when you run this shader you end up with a nice sharp areas (those near the focal point) and more blur as objects get further away from this point.
there is however much more to consider, like bleeding of blurred areas into areas that should be sharp which can be fixed but it involves sampling the depth buffer a lot more to ensure that blur samples are only taken from pixels that are a similar detph.
also worth considering the “factor” mentioned before and how it can be used to produce smoother falloff and falloff that scales nicely.
see this image:

Right I have run out of time, but if you want anything else or don’t understand any of my ramblings let me know and I will try and acomodate.
(live demos to follow when I get some time)
Categories
A test molehill screen capture
here is a quick fraps capture showing some integrated physics (bullet flash*) and some post processes
post processes are pretty easy to implement but I am still looking to make them chainable so they can be used together.
have got some simple ones like invert, sepia… and some more complex ones like convolutions and depth of field as well as DOF with depth based bleed reduction which works quite well.
materials work by stacking various techniques together such as texture, fog, rim, reflection, refraction, diffuse..etc. which makes building the materials really quick! also supports a few blend modes for blending these techniques.
Categories
Molehill examples (source added)
update: this was built to run on the incubator version of the flash player so will not work on the standard fp11
I will update this demo today to run on the release version.
YO!!!
Having enjoyed playing with adobe flash’s new molehill API I though I should share some demos.
I’ve written quite a few and being a lazy boy never really uploaded many of them. So that’s what this page is for :).
I will start upload the demo’s from time to time to this post with a little description of what’s going on.
note: you need the incubator version of flash to view these download here
Demo 1 (click image or link below)

The shader in this demo uses a combination of reflection, refraction and cubemap sampling.
mouse wheel to zoom in and out
Shader Code:
AGAL-
VERTEX SHADER:
//vc0 is worldViewMatrix
//vc4 is worldMatrix
//vc8 is camera position
//vc9 is just a [1,1,1,1] (and yes I coulda just used the w of the position)
m44 op va0 vc0
m44 vt0 va0 vc4
m33 vt1.xyz va1 vc4
sub vt2 vc8 vt0
nrm vt2.xyz vt2
mov v0 vt1.xyz
mov v1 vt2
dp3 vt3 vt2.xyz vt1.xyz
sub vt3 vc9.w vt3
mov v2 vt3
FRAGMENT SHADER:
//fc0 is [0.9, 0.81, 0, 1].. which was roi and roi squared I think… been a while 🙂
dp3 ft0 v1 v0
add ft0 ft0 ft0
mul ft0 v0 ft0
sub ft0 v1 ft0
neg ft0 ft0
nrm ft0.xyz ft0
dp3 ft2 v1 v0
mul ft2 ft2 v0
sub ft2 ft2 v1
mul ft2 ft2 fc0.x
dp3 ft1 v1 v0
mul ft1 ft1 ft1
sub ft1 fc0.w ft1
mul ft1 fc0.y ft1
sub ft1 fc0.w ft1
sqt ft1 ft1
mul ft1 ft1 v0
sub ft1 ft2 ft1
tex ft0 ft0 fs0
tex ft1 ft1 fs0
sub ft2 ft0 ft1
mul ft2 ft2 v2
add ft2 ft2 ft1
mov oc ft2
now if you think that looks scary…. please compare it to
AGAL.m44(“op”, “va0”, “vc0”) + //output
AGAL.m44(“vt0”, “va0”, “vc4”) + //world space pos in vt0
AGAL.m33(“vt1.xyz”, “va1”, “vc4”) + //world space nrm in vt1
AGAL.view(“vt2”, “vt0”, “vc8”) + //view in vt2
AGAL.mov(“v0”, “vt1.xyz”) + //normals in v0
AGAL.mov(“v1”, “vt2”)+ //view in v1
AGAL.fresnel_inv(“vt3″,”vt2″,”vt1″,”vc9.w”)+ //fresnel in v2
AGAL.mov(“v2″,”vt3”); //output
and
AGAL.reflect(“ft0”, “v1”, “v0”) +
AGAL.refract(“ft1”, “v1”, “v0”, “ft2”, “fc0.w”, “fc0.x”, “fc0.y”)+
AGAL.tex(“ft0″,”ft0″,”fs0″,”cube”,”clamp”,”linear”)+
AGAL.tex(“ft1″,”ft1″,”fs0″,”cube”,”clamp”,”linear”)+
AGAL.lerp(“ft2”, “ft1”, “ft0”, “v2”)+
AGAL.mov(“oc”, “ft2”);
(see how much better that is…go agal helper go)
more to come 🙂
NEW UPDATE COMING SOON (09.09.2011)- a few more functions and will proper code hints
UPDATE 19.05.2011
helper is now on google code
>>AGAL<<
these static functions ideally can help you build shaders in a more readable and more reusable way.
they are an incomplete set and require additions and improvement.
so feel free to post additions and alterations if I have cocked up somewhere (a good chance of that as I boshed this out in a rush)
and Ill see that they get worked in.
//util functions (this section is the one I would like to see grow) //same as 'mix' public static function lerp(target:String, source1:String, source2:String, ratio:String):String { var code:String = ""; code += sub(target, source2, source1); code += mul(target, target, ratio); code += add(target, target, source1); return code; } //should return the length of the source vector public static function length(target:String, source:String):String { var code:String = ""; code += dp3(target, source, source); code += sqt(target, target); return code; } //calculates the reflection vector based on a view direction and a normal (formula: r = V - 2(V.N)*N) public static function reflect(target:String, view:String, normal:String):String { var code:String = ""; code += dp3(target+".w", view+".xyz", normal+".xyz"); code += add(target+".w", target+".w", target+".w"); code += mul(target+".xyz", normal+".xyz", target+".w"); code += sub(target+".xyz", view+".xyz", target+".xyz"); code += neg(target+".xyz", target+".xyz"); return code; } //generic helpers (usefulness debatable) //unit vector from Light to the Vertex position public static function light(target:String, light:String, position:String):String { var code:String = ""; code += sub(target, position, light); code += nrm(target, target); return code; } //unit vector from Vertex P to the View position V public static function view(target:String, position:String, camera:String):String { var code:String = ""; code += sub(target, camera, position); code += nrm(target, target); return code; } //unit vector halfway H, between L and V, used for Blinn simplification public static function half(target:String, light:String, view:String):String { var code:String = ""; code += add(target, light, view); code += nrm(target, target); return code; } //wrappers for inbuilt functions (incomplete) public static function mov(target:String, source:String):String { return "mov " + target + " " + source + "\n"; } public static function add(target:String, source1:String, source2:String):String { return "add " + target + " " + source1 + " " + source2 + "\n"; } public static function sub(target:String, source1:String, source2:String):String { return "sub " + target + " " + source1 + " " + source2 + "\n"; } public static function mul(target:String, source1:String, source2:String):String { return "mul " + target + " " + source1 + " " + source2 + "\n"; } public static function neg(target:String, source:String):String { return "neg " + target + " " + source + "\n"; } public static function sqt(target:String, source:String):String { return "sqt " + target + " " + source + "\n"; } public static function nrm(target:String, source:String):String { return "nrm " + target + " " + source + "\n"; } public static function dp3(target:String, source1:String, source2:String):String { return "dp3 " + target + " " + source1 + " " + source2 + "\n"; } public static function pow(target:String, source1:String, source2:String):String { return "pow " + target + " " + source1 + " " + source2 + "\n"; } public static function m33(target:String, source1:String, source2:String):String { return "m33 " + target + " " + source1 + " " + source2 + "\n"; } public static function tex(target:String, coord:String, texture:String, type:String, wrap:String, filter:String):String { return "tex "+target+" "+coord+" "+texture+" <"+type+","+wrap+","+filter+">" + "\n"; } |
🙂
as an idea for some of the functions what I could do is add and optional boolean parameter called normalize and if its set I could automatically normalize the output.
would like to see the following functions added:
refract (tried to do this one myself but got scared and ran away)
smoothstep (see wikipedia about this one… the problem is that it requires the use of a constant or two and ideally these wouldn’t have to be passed in as parameters.. any idea if that is possible?)
..and anything else anyone can think of that the api is currently misisng
and I’ll soon be putting in some lighting methods for helping people get diffuse and specular lighting.
Categories
Culling scene objects in flash
Not being satisfied with my current methods for object culling I set out on a new adventure in actionscript.
The most common method is culling spheres against the view frustum in world space, and from what I have seen in implementations in other engines it is not very efficient.
(you can be checking the spheres against up to 6 planes in 3d space)
The current technique I was using was to project all my objects bounding box vertices to screen space then from there it is a very trivial check to see if any of those points are in the viewport and if so, then render the object. The downside to this method is that it requires all the bounding boxes vertices to be projected into world space then on to the screen, that means that an individual matrix is required per object and must be regenerated whenever the object moves.
My latest efforts get round the need for these matrices, here be the demo(s).
(still a few kinks in it but the idea is solid I think)
500 cubes
1000 cubes
5000 cubes beware it may destroy your machine
(if you could report any frame-rates with specs that would be ace and appreciated)
all the cubes are rendering perspectively correct textures too.
mouse wheel to move camera in/out CAUTION: the further out you go the more work it’s gotta do to render so be gentle!!
if people are interested how I did it, be sure to ask, and once I have worked it out myself (some crazy hacky math in there) then I can explain 🙂
will also up some other demos that better showcase what is going on… have tested this with over 20,000 cubes and still hit 30fps as long as only a minimal number are required to be rendered.
b
Categories
holy stromboli

http://www.youtube.com/watch?feature=player_profilepage&v=m053MqzstVg

http://www.youtube.com/watch?feature=player_profilepage&v=tgwi0lWgX8w
go flash player go!!
looks like our sissy little platform is getting some bigger guns!!
some great demos there from the Alternativa boys and Mythos Labs!
awesome stuff… and its about time too 😉
all thanks to project “molehill”
Categories
Occlusion Culling in 3D
POW!
this is the semi-result (its not quite finished yet) of some of my research into occlusion culling.
screenshot:

link to demo: (click the big red button to toggle the magic)
http://dev.bwhiting.co.uk/b3d/occlusion/
the big red planes are marked as occluders and are semi-transparent so you can see what is going on behind em 😉
If you want to know more about this just let me know, have half written 2 posts about the inner workings of this but lack motivation to finish them.